 |
Simple Name Tag
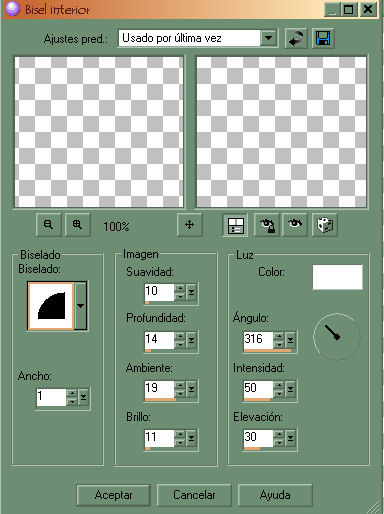
-Ready to Start- To complete this tut you will need the DSB Flux Noise filter. You can get it here: Beautiful girl tube was tubed by Johanna. Open background and girl image from the supplies. Resize the girl image to 200 x 483 pixels. Copy/paste as new layer onto the background and place her to the left. Now click on the text tool and with the foreground color set to any gold gradient and the background color set to #9d2a4f, write out your name. Note: I used font type Lapidary 333 Blk BT. I am sure it is a Windows font. I used size 72 and outline width set to 2.0. Now once you have your name written out and in place, go to Selections Menu and choose Select All. Again to Selections Menu and choose Float. Once again to Selections Menu and choose Selections/Modify/Contract and put 2 into the box that will pop up. You should now see only the inner part of the text selected. Next go to Effects/3D Effects and choose Inner Bevel. Apply using the color and settings as seen below:
Now go to Effects/Filters/DSB and choose Bright Noise. Apply to the text using the following settings: Intensity: 35 Direction: Lighter Click OK. Go to Selections Menu and choose Select None. Now open the sparkle I included in the supplies. Copy/paste as new layer onto the image. Resize it just a bit using the deform tool. Go to Layers/Duplicate and duplicate it as many times as you want the sparkle to appear on your text. Place a sparkle on every other part of the text. Merge all layers and open Animation Shop. Copy the image by going to Edit/Copy and paste it into animation shop as new animation. Go back to PSP and undo the changes just until you unmerge the layers. Now one by one click on the sparkle layers and duplicate each one. To do this just click on every sparkle imaeg in you layers palette one by one and duplicate them by going to Layers/Duplicate. You will notice that each time one is duplicated it will become brighter and is what will make it blink once we animate it. Once you have duplicated each sparkle layer, go to Layers menu and merge all. Copy the image by going to Edit/Copy and paste it into animation shop After Current Frame. You can now view and save your animation..:)
|
|
Any resemblance to any other tutorial is coincidental Property of Diana's Creations |